Release 2.4.0 (Klestskoek)
3T Pro:
3T Pro is the next level of traceability, offering new features around guidance levels, reprocessing timers, custom destinations and more to come. A breakdown of the new features available in Standard and Pro are outlined below.
What’s Included with Pro?
Pro organisations will gain access to the following:
- “No Guidance” setting for decontamination cycles
- Reprocessing Timers
- Custom Status Creation
- Enhanced Asset Data & Tracking
Please note – while the app will continue to work on the existing version (1.48.5), all new features require app version 1.50.0 to be downloaded.
Guidance Levels:
3T now has the ability to supply different levels of guidance to app users, depending on what their organisation has selected and which tier of 3T has been purchased.
To set a Guidance Level, any user from Organisation Admin upwards will need to access the relevant organisation’s page. In the left-hand menu, select “Preferences”.

For Standard 3T users, the dropdown menu will allow “Full Guidance” and “Timers Only”. Pro users will have these two options, plus “No Guidance”. Simply select the level of guidance to apply to every user in the organisation and the portal will save your changes automatically.
The app will pick up the change as soon as a decontamination cycle is started. Please note – the app must be online to pick up these changes
Full Guidance – the full version of 3T traceability, offering a step-by-step guide, with animations, activation timers and contact timers. This option is best chosen for a more rigorous traceability experience.
Timers Only – this option gives a more streamlined version of traceability, while still ensuring that activation and contact timers remain in place. Users will be able to complete the steps of a decontamination cycle without prompts from the app, but will still see the activation and contact timers required for Tristel products.
No Guidance (Only available with the 3T Pro package) – all timers and visual aids are removed. Simply select your medical device, scan your Tristel products, complete the decontamination event without guidance from the app then click complete. You will receive your cycle code and be able to set the Destination as you can with the other two options.
All Tristel product IFUs must still be followed when decontaminating medical devices.
Status Settings:
Admins within organisations will be able to set which Statuses are shown to their app users at the end of a decontamination cycle, and set which status is selected by default. Standard users will always see the option of Patient ID Known, Patient Ready and Storage, but Pro users have the option to remove unnecessary statuses from their app.
Additionally, up to three custom statuses can be added to the app for all users within the Pro organisation.
As with all of these new features, Status Settings can be accessed via the Preferences tab in the portal. To add a new Status, click on the Manage button within the Device Status Options section. Type in the name of the custom status you’d like to add in the text box, and select what Status Type they related to.
Status Types are:
- Patient Information – this is used when app users need to add a code or number as an identifier against the decontamination record
- In Progress – this is used to show a decontamination event has taken place and that the Medical Device is ready for use on a patient
- Storage – this is used to show that a Medical Device has been decontaminated, but is not going to be used with a patient in the near future and will therefore be stored
Once completed, click on Submit to save your changes. Each organisation can have a maximum of three custom Statuses, making the maximum number of Statuses that can be shown on the app as six.

To remove a Status from your organisation, click on the “bin” icon, then click on Submit. When removing a Status from an organisation, it will not effect any cycles that are already in that Status, but it will prevent app users from being able to select the Status when completing future decontamination events.
Enhanced Asset Data Tracking:
Pro organisations will now be able to track their Medical Device in more depth on the portal. The additional information that can be added to each Medical Device are:
- Purchase Date
- Commissioned Date
- Condition
- Status
- General Notes
Purchased Date & Commissioned Date:
To enter the date of purchased and date of commission of a Medical Device, navigate to the Medical Devices tab, click on the “pen” icon to open the modal to edit the Medical Device, and access the General Details tab. The Purchased Date and Commissioned Date field both allow a date to be selected by manually entering, or using the date selector option.

Be sure to click on the “Update device” button at the end of the process to ensure your changes are saved.
To view the Status of a Medical Device, locate the device in the Medical Devices tab and click on the “eye” icon to access the detailed view. The Status of the Medical Device will be shown within the main section of the page. The Status of the Medical Device is the Status of the most recently completed decontamination cycle against it.

The detailed view will also show the current Condition of the Medical Device. From launch of Pro, no Medical Devices will have a Condition set, but new Conditions can be added by clicking on the “View condition history” button.
The Condition History page will show a reverse chronological order of all Conditions update with a timestamp, the Condition, any note captured by the user who edited it, and who it was recorded by.
To set a new Condition, click on the “+ Add condition note” button and select the Condition that best suits the Medical Device. The user may add a note to the update, which will be useful for explaining why the Medical Device has moved into that Condition. Once the user is happy that everything is correct, click the “Add condition note” button.

The same Condition can be set more than once in a row, in case a Medical Device needs an update but it is still “On Loan”, for example.

Remembering Products:
All Traceability organisations in 3T will have access to the new feature that allows Admins to turn the remembering products section of the app on or off. This setting will default to on, but can be turned off by accessing the Preferences tab and clicking the toggle under the Remember Products section.

Turning the setting to off will mean that users in the app will no longer be able to save Tristel products for a future decontamination cycle, and must scan Tristel UDIs for every decontamination cycle.

When set to on, users can tell the app to remember the GTINs of the products scanned, when the same clinical setting and medical device combo is selected.
Allow PHI:
PHI (Protected Health Information) is information about patients that must remain confidential. When in the confines of 3T, this extends to the Patient ID that can be stored against a decontamination cycle, or any custom Statuses that are created under Patient Information.

This setting, which can be turned on and off via the Preferences tab, allows organisations to simply not allow any PHI from entering the platform. Organisations will not be able to turn the PHI toggle off if they have any Patient Information Status assigned to their organisation, so remember to remove these from the organisation before using the PHI toggle.

When set to on, the app no longer allows users to enter, view or edit Patient IDs. This is the same for the portal.
When set to off, users may enter, view and edit Patient ID information in both the app and the portal.
This feature is available to Standard and Pro organisations.
Certification Notifications:
We have introduced the function for all 3T users that one email will be sent directly to staff members when their training is 21 days from expiring, and another when it has expired.

Users who have been archived will not receive the email and all emails that are sent will be sent to the email address registered with 3T.
This function will automatically be turned on as part of this release and cannot be removed.

Organisational Reporting:
Admins can access a one page report giving them a visual indication of their compliance level for training and traceability. A single page can give a snapshot of which areas need improving on and where things are going well.

A new tab, Reporting, is now accessible from the left-hand menu, where users can choose to generate a report from one of four options:
- The last full week (Monday – Sunday)
- The last full month (1st – 28th / 29th / 30th / 31st)
- The last full three calendar months
- The last full twelve calendar months
When you’ve made your selection, 3T will show you a helpful report consisting of current and expired training, decontamination trends and highlight any gaps in training.
The report can be exported to PDF in a printer-friendly format.
Reprocessing Timers:
3T Pro now gives visual guidance as to whether a medical device may be used with a patient, or whether it needs to be decontaminated first, as per the guidelines of the organisation it’s being used in.
Pro organisations may set an organisational level timer. The Medical Device must be used with a patient within that time. To create the timer, access the Preferences tab and select a duration from the dropdown menu within the Reprocessing Expiry Timer section.
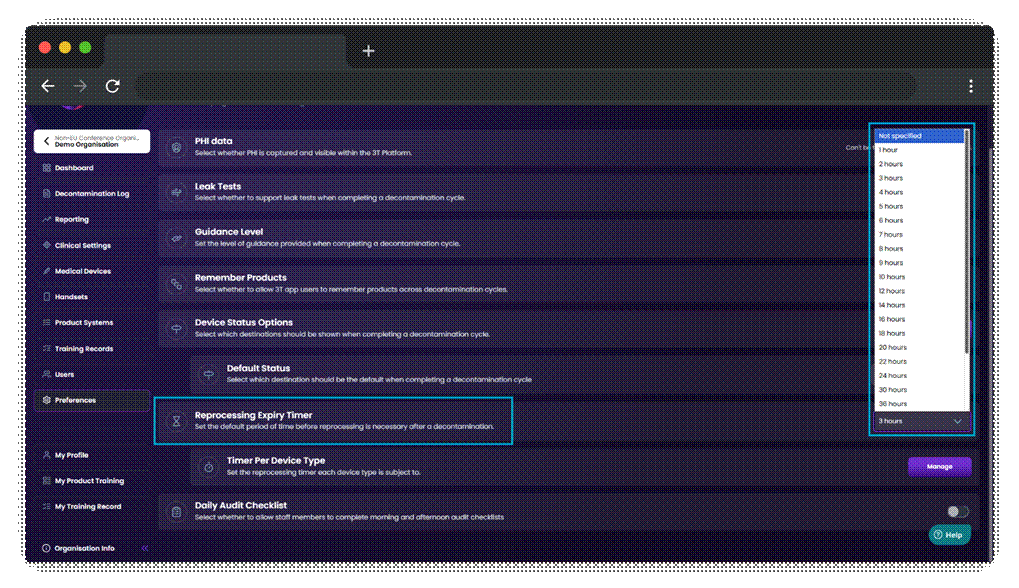
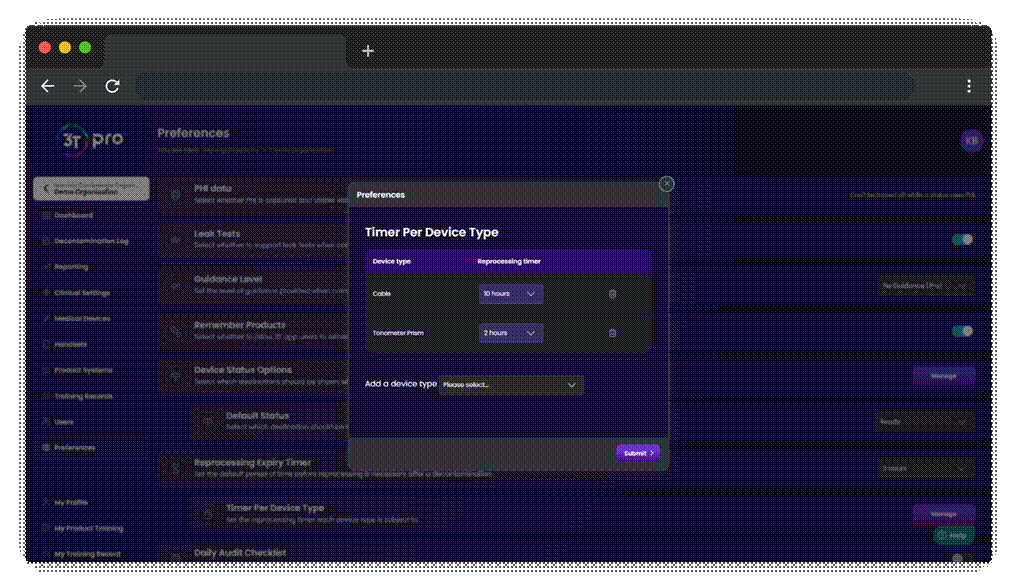
Furthermore, each medical device type can be assigned a timer, in hours, which will override the organisational level timer that has been set. To set a timer against a Medical Device Type, access the Preferences tab and click on “Manage”. Any Medical Device Type can be selected from the dropdown menu. For each Medical Device Type that is added, a duration in hours can be selected to override the organisational level timer. The durations can be updated in real-time, and can be removed or changed at any point. Removing a timer will cause the Medical Device Type to revert to the organisational level standard, if one has been set.

Finally, an individual medical device can have its own timer set, in hours, which will override both the organisational level timer and medical device type timer if one is set.
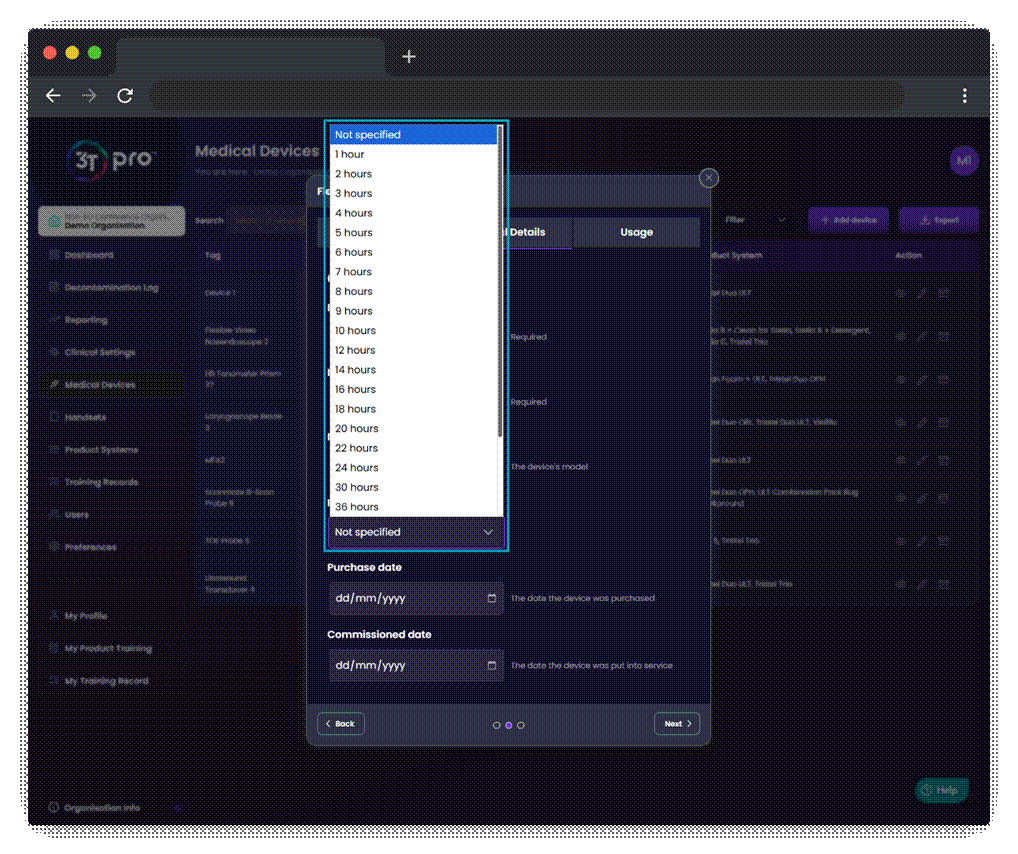
To set the timer against an individual Medical Device, click on Medical Devices from the left-hand menu in your organisation. Once you’ve found the relevant Medical Device from the list, click on the pen icon to access the modal to edit the Medical Device.
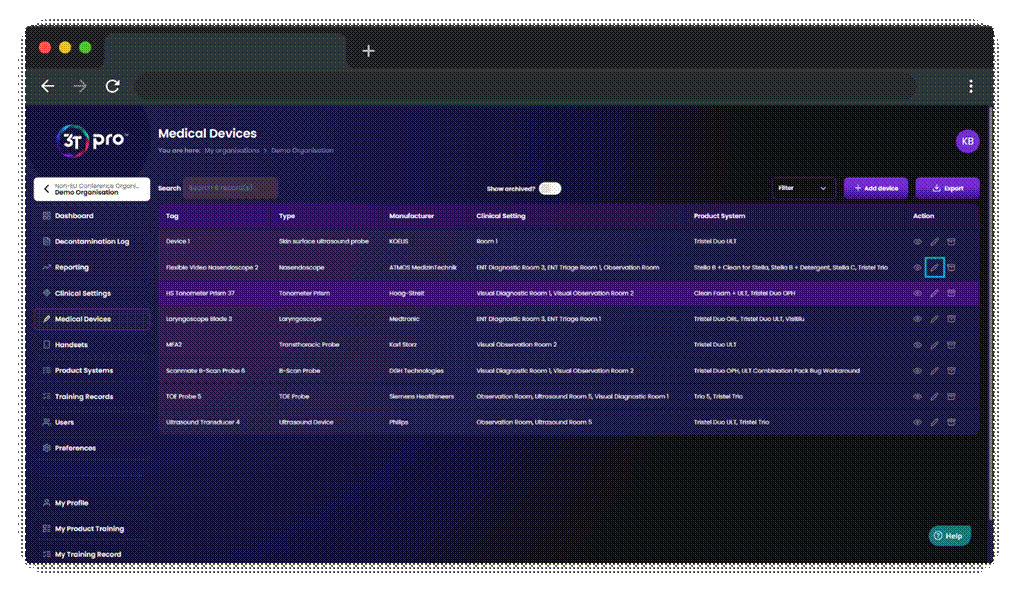
Under the General Details tab, select the duration you’d like to apply to this Medical Device. Make sure to navigate to the final tab of the modal and click “Update device” for your changes to be saved.
A timer on a medical device begins the moment a decontamination cycle is completed on it. When using the Check Device feature or beginning a new cycle on the 3T app, medical devices within their timer will behave as they did prior to launch – the latest decontamination cycle will be shown and the user may update it as desired. If the medical device has gone past its time limit, the user will be given the option to move the medical device into Storage (which will require a new decontamination prior to be used with a new patient) or to complete a decontamination cycle now.
When a Medical Device’s timer has expired, it will appear in orange in the 3T app. At this point, the Medical Device must either go into Storage, or have a new decontamination cycle completed on it.

Should a Medical Device be used with a patient, but the record was not updated with 3T until after the expiry time ran out, an Admin may login to the portal to update the Status of the Medical Device manually.
General Release Updates
App:
- Added compatibility for Zebra ZQ320 Plus handheld printer
Was this article helpful?
That’s Great!
Thank you for your feedback
Sorry! We couldn't be helpful
Thank you for your feedback
Feedback sent
We appreciate your effort and will try to fix the article